
ROS2-023-ROS2 Tools: Coordinate Transforms (4) — Publishing Point Messages
Introduction
In the previous chapter we went through static broadcasting and dynamic broadcasting. This chapter is mainly about how to publish a point message.
Case walkthrough
Here is the requirement for the case:
There is an unmanned vehicle, with a fixed lidar mounted on its chassis. The chassis and the lidar each correspond to a frame, and each frame's origin is taken at its geometric centre. The lidar has scanned a point-shaped obstacle and can locate the obstacle's coordinates. Please publish the obstacle's coordinate point in the lidar frame, then check the result in Rviz2.
The case above is a simple topic publisher program. Once you know about the geometry_msgs/msg/PointStamped interface message used for publishing point information, you just publish messages through a topic publisher following some logic of your own.
The main steps are:
- Write the topic publisher implementation;
- Edit the config file;
- Build;
- Run;
- View the frame relationships in rviz2.
This case will be implemented in C++ and in Python, and both follow the steps above.
Preparation
In a terminal, go into the workspace's src directory and run these two commands to create a C++ package and a Python package:
ros2 pkg create cpp03_tf_broadcaster --build-type ament_cmake --dependencies rclcpp tf2 tf2_ros geometry_msgs turtlesim
ros2 pkg create py03_tf_broadcaster --build-type ament_python --dependencies rclpy tf_transformations tf2_ros geometry_msgs turtlesim
I. Writing the topic publisher implementation
In the src directory of the cpp03_tf_broadcaster package, create a C++ file named demo03_point_tf_broadcaster.cpp and fill it in with the following:
 /*
    Requirement: publish a point's data relative to the lidar frame
    Steps:
        1. Include the header files;
        2. Initialise the ROS2 client
        3. Define the custom node class:
            3-1. Create the publisher
            3-2. Create the timer
            3-3. Assemble and publish the message in the callback
        4. Call the spin function, passing in the node object pointer
        5. Release resources.
 */

// 1. Include the header files;
#include "rclcpp/rclcpp.hpp"
#include "geometry_msgs/msg/point_stamped.hpp"

using namespace std::chrono_literals;
// 3. Define the custom node class:
class PointBroadcaster: public rclcpp::Node{
    public:
        PointBroadcaster() : Node("point_broadcaster_node_cpp"), x(0.0){
            // 3-1. Create the publisher
            point_pub_ = this->create_publisher<geometry_msgs::msg::PointStamped>("point", 10);
            // 3-2. Create the timer
            timer_ = this->create_timer(0.1s, std::bind(&PointBroadcaster::timer_callback, this));
        }

    private:
        // 3-3. Assemble and publish the message in the callback
        void timer_callback(){
            // Assemble the message
            geometry_msgs::msg::PointStamped point;
            point.header.frame_id = "laser";
            point.header.stamp = this->now();

            // Move the point along
            x += 0.005;
            point.point.x = x;
            point.point.y = 0.0;
            point.point.z = -0.1;
            // Publish the message
            point_pub_->publish(point);
        }

        rclcpp::Publisher<geometry_msgs::msg::PointStamped>::SharedPtr point_pub_;
        rclcpp::TimerBase::SharedPtr timer_;
        double_t x;
};

int main(int argc, char *argv[])
{
    // 2. Initialise the ROS2 client
    rclcpp::init(argc, argv);
    // 4. Call the spin function, passing in the node object pointer.
    rclcpp::spin(std::make_shared<PointBroadcaster>());
    // 5. Release resources;
    rclcpp::shutdown();
    return 0;
}In the py03_tf_broadcaster directory of the py03_tf_broadcaster package, create a Python file named demo01_static_tf_broadcaster_py.py and fill it in with the following:
"""
    Requirement: publish a point's data relative to the lidar frame
    Flow:
        1. Import the packages;
        2. Initialise the ROS2 client;
        3. Define the custom node class;
            3-1. Create the publisher
            3-2. Create the timer
            3-3. Assemble and publish the message in the callback
        4. Call the spin function, passing in the node object;
        5. Release resources.


"""
# 1. Import the packages;
import rclpy
from rclpy.node import Node
from geometry_msgs.msg import PointStamped

# 3. Define the custom node class;
class PointBroadcasterPy(Node):
    def __init__(self):
        super().__init__("point_broadcaster_py_node_py")
        self.point_pub_ = self.create_publisher(PointStamped,"point",10)
        self.x = 0.0
        self.timer_ = self.create_timer(0.1, self.timer_callback())

    def timer_callback(self):
        # Assemble the information
        point = PointStamped()
        point.header.frame_id = "laser"
        point.header.stamp = self.get_clock().now().to_msg()
        self.x += 0.005
        point.point.x = self.x
        point.point.y = 0.0
        point.point.z = 0.2
        # Publish the information
        self.point_pub_.publish(point)

def main():
    # 2. Initialise the ROS2 client;
    rclpy.init()
    # 4. Call the spain function, passing in the node object;
    rclpy.spin(PointBroadcasterPy())
    # 5. Release resources.
    rclpy.shutdown()

if __name__ == '__main__':
    main()
II. Editing the config file
In CMakeLists.txt, the core config for a publisher or subscriber program looks like this:
find_package(ament_cmake REQUIRED)
find_package(rclcpp REQUIRED)
find_package(tf2 REQUIRED)
find_package(tf2_ros REQUIRED)
find_package(geometry_msgs REQUIRED)
find_package(turtlesim REQUIRED)

add_executable(demo03_point_tf_broadcaster src/demo03_point_tf_broadcaster.cpp)
ament_target_dependencies(
  demo03_point_tf_broadcaster
  "rclcpp"
  "tf2"
  "tf2_ros"
  "geometry_msgs"
  "turtlesim"
)

install(TARGETS demo03_point_tf_broadcaster
DESTINATION lib/${PROJECT_NAME})In setup.py, add the following to console_scripts under the entry_points field:
...
entry_points={
    'console_scripts': [
        'demo03_point_tf_broadcaster_py = py03_tf_broadcaster.demo03_point_tf_broadcaster_py:main'
    ],
},
...
III. Building
In a terminal, go into the current workspace and build the package:
colcon build --packages-select cpp03_tf_broadcastercolcon build --packages-select py03_tf_broadcasterIV. Running
In the current workspace, open two terminals. In terminal 1, enter the following command to publish the static coordinate transform of the lidar (laser) relative to the chassis (base_link) (published with the command approach used in the previous chapter):
. install/setup.bash
ros2 run tf2_ros static_transform_publisher --frame-id base_link --child-frame-id laser --x 0.4 --y 0.0 --z 0.2
Then in terminal 2, enter the following command to run the code:
. install/setup.bash
ros2 run cpp03_tf_broadcaster demo03_point_tf_broadcaster. install/setup.bash
ros2 run py03_tf_broadcaster demo03_point_tf_broadcaster_pyV. Viewing the frame relationships in Rviz2
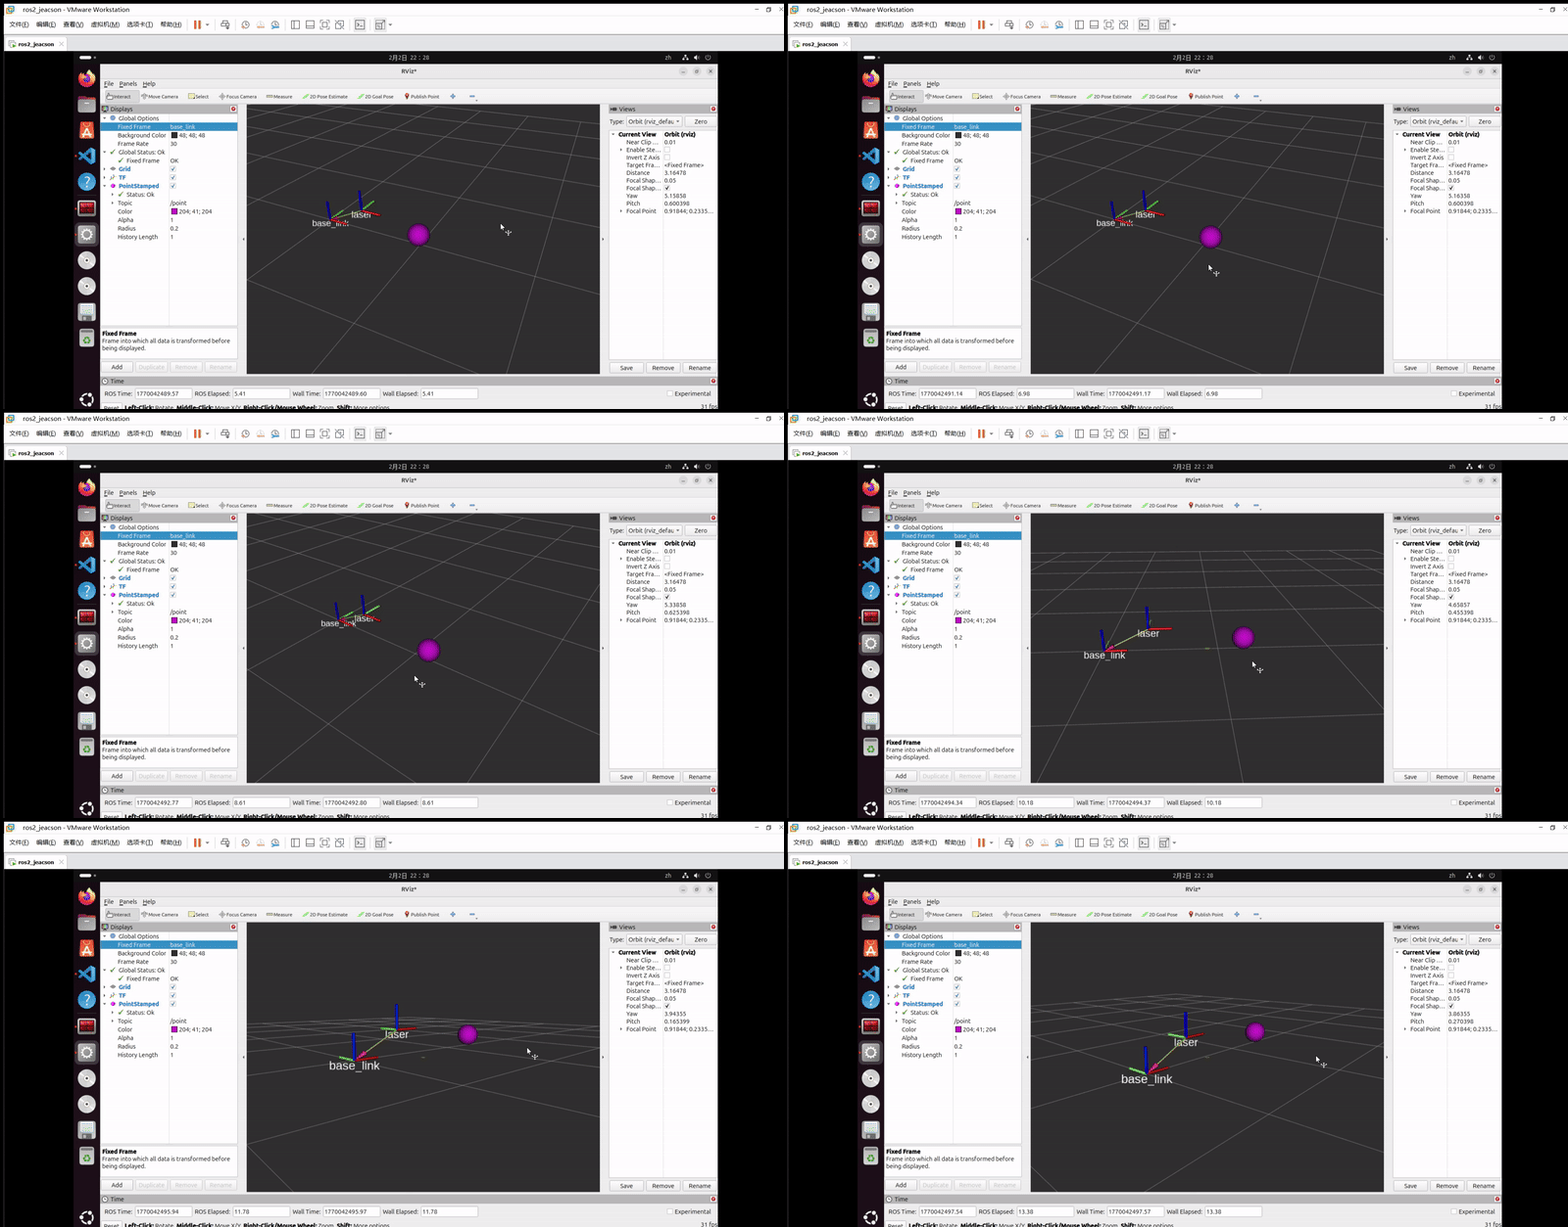
Open a new terminal, run the command rviz2 to start Rviz2, and configure the relevant plugins to view the coordinate transform messages:
- Set
Fixed FrameunderGlobal Optionstobase_link; - Click the
addbutton and add theTFplugin; - Tick
show namesin theTFplugin.
The Grid window on the right then displays the transform relationship between the two frames graphically.
- Click the
addbutton again and add thePointedStampedplugin; - In the
PointedStampedplugin, change thetopicfield to “/point”.
The Grid window on the right then displays the transform relationship between the point and the frame graphically.
Important
This article was translated by Hermes Agent; the original text can be found at here. The translation is for reference only. Translation time: 2026-11-05